"Superior performance at a budget price"
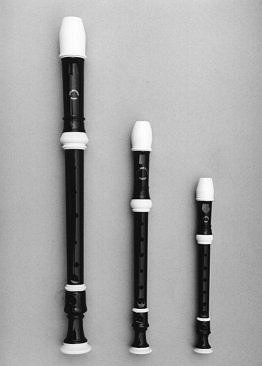 | The Dolmetsch Nova range gives you a complete matched range, from sopranino to direct blow bass, pitched at international standard A (440Hz). With matching profiles, curved windways (except for sopranino) and contrasting cream mounts, they look great too. Thanks to a specially chosen ABS construction, they are super-strong and very light; even the bass weighs just 780 gm. Here's what international soloist Piers Adams said about them in a comparative review published in The Music Teacher (October 1998) "The descant compares well with its Japanese rivals, (the Aulos 205, selling for just under £11, and the Yamaha 302, slightly cheaper at £10), and is a snip at £6" ... "good first trebles are the Aulos 209 and the Dolmetsch Nova (both around £16) and the Yamaha 302B (£22)" ... "tenors start at £45 for the keyless Aulos model 311N, moving up to £55, £65 and £80 respectively for the Dolmetsch (Nova - now with adjustable thumbrest), Yamaha and Aulos tenors with keys for the bottom holes." For information about the availability of Dolmetsch Nova Recorders please contact AAFAB b.v., Utrecht, The Netherlands Go to their website for further contact details. |
Classic and Dolonite Plastic Tenor Recorder Spares
|
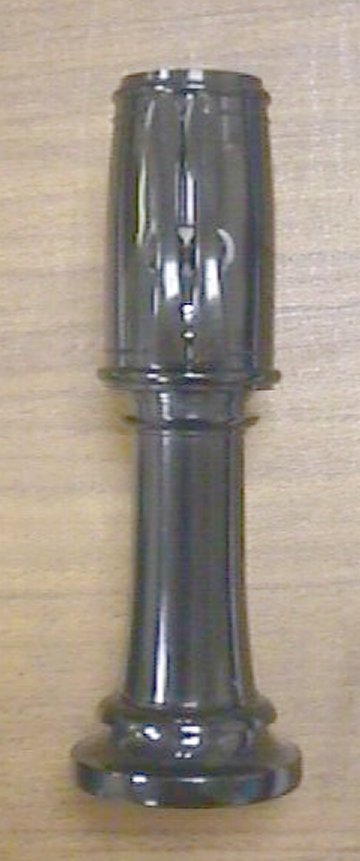
The classic tenor is no longer manufactured but we are able to supply replacement keys, replacement key pads and replacement saddle and spring units. We provide below instructions for fitting these parts. We can also service and replace single brass keys for the older Dolonite tenors. The Classic tenor was one of the first plastic tenors to come with a double C / C# key system. This system is designed to be maintained by the user. You can replace either of the keys, replace the key pads (which, over time, will wear) and replace the unit which screws into the body of the foot section and to which the keys clip. The left and right keys are not interchangeable and when ordering a single key place the foot section on a flat surface so that you are looking down the instrument from the socket to the flared bell and denote the key on the left-hand side, the C key, and the key on the right-hand side, the C# key. If you check the finger holes you will see that the C# hole is about twice the size of the other hole. If you play the recorder then you will know that the C# key is the single key depressed with the bottom finger to give the note bottom C# while the C key is only depressed when both keys are depressed together, in particular for the note bottom C. When ordering replacement parts, check that the saddle unit on your present instrument is still in good condition. The screw that attaches the unit to the body passes between two leaf springs, which form part of the unit moulding. Both springs must be present and working as they return the key to its open position after use. Similarly, for the keys to clip to the saddle unit, the short metal rod or dowel that passes transversely across the unit should be present, shiny and clean. If the metal rod is missing or if either spring has broken off or lost its 'springiness' you should replace the whole unit. The saddle unit is sent with fitted metal dowel and the screw needed to attach it to the body. When you receive the replacement unit, remove the old unit (if it is still attached) by unscrewing the original screw. Place the new unit so that the springs lie towards the finger holes and the metal dowel lies on the other side of the screw from the finger holes. Using a small screwdriver, screw the unit to the body tightly enough to prevent movement. To replace the pads on the keys, prise away the old pad and running a very small amount of super glue or contact adhesive into the well where the key pad seats, press the pad into place. Do not use too much glue as this may spread out over the pad surface. The keys clip onto the saddle unit with the notch clipping onto the metal dowel. When both keys are in their correct position, the notches on each key lie next to each other in the middle of the metal dowel. The keys should move freely and should not squeak. Any squeak can be eliminated with a little oil or grease. |
Dolmetsch Nova ABS Recorder Prices
| Code | Description | ex. VAT | inc. VAT | ||
| 2511 | Descant/Soprano Cleaning Rod | list: £ 0.31 | list: £ 0.36 | ||
| 2521 | Descant/Soprano Cleaning Rod | list: £ 0.43 | list: £ 0.50 | ||
| 2531 | Descant/Soprano Cleaning Rod | list: £ 0.61 | list: £ 0.72 | ||
| 2536R for C | Classic Tenor Key for C hole | list: £ 1.70 | list: £ 2.00 | ||
| 2536L for C# | Classic Tenor Key for C sharp hole | list: £ 1.70 | list: £ 2.00 | ||
| 2537 | Classic Tenor Saddle & Spring | list: £ 2.55 | list: £ 3.00 | ||
| 2538 | Classic Tenor Keys (pack of 10) | list: £ 2.55 | list: £ 3.00 | ||
| Grease | Non-animal Joint Grease | list: £ 0.44 | list: £ 0.52 | ||
| DOLKEY | Dolonite Tenor Key | list: £ 10.00 | list: £ 11.75 | ||